
Setting Up a Linux in VirtualBox
Interested in exploring Linux without altering your current system setup? VirtualBox is the perfect solution for a risk-free trial. Before we dive into installing Conda on Linux, let’s first set up a Linux environment in VirtualBox.
Key Points:
- VirtualBox is a powerful tool for running multiple operating systems as virtual machines within your primary OS, effectively acting as separate computers.
- Ensure your machine is equipped with sufficient resources to manage both the virtual machine and your native OS without hiccups. Optimal performance typically requires at least 8GB of RAM, 25GB of storage per virtual machine, and a quad-core processor.
- To initiate a virtual machine, first obtain the ISO file for your chosen Linux distribution. Then launch VirtualBox, select “New,” and proceed with the instructions displayed.
What is VirtualBox?
Oracle VM VirtualBox stands as a robust, open-source virtualization software that empowers users to operate multiple operating systems on a single computer. With this capability, you can effortlessly install and utilize Linux on your Windows or macOS system, all without the need to partition your hard drive or invest in supplementary hardware. This versatile tool serves as an ideal solution for individuals seeking to explore diverse operating systems, conduct software testing, or acquire new skills, all while preserving the integrity of their primary computing environment.
Advantages of Installing Linux within VirtualBox
There are several compelling reasons to consider installing Linux within a VirtualBox environment:
- Experimentation: If you’re curious about Linux but hesitant to commit to a full installation, a virtual machine provides an ideal way to explore the operating system without making any changes to your primary setup;
- Learning: Installing Linux within VirtualBox offers a secure and controlled environment for acquiring and honing new skills, whether it’s in the realm of system administration, programming, or troubleshooting;
- Software Testing: Running Linux within a virtual machine empowers developers and testers to experiment with various software versions and test compatibility, all without the need for multiple physical machines;
- Security: Virtual machines establish an isolated environment, mitigating the risk of malware or other threats affecting your primary operating system, enhancing overall system security.
Essential Requirements for Setting Up a Linux Virtual Machine
Before embarking on the journey of setting up a Linux virtual machine (VM), it’s imperative to ensure that your computer possesses sufficient system resources to seamlessly manage both the VM and your primary operating system. Insufficient resources may result in a sluggish and troublesome experience. Below, we outline the minimum specifications we recommend for a smooth VM experience:
- 8GB of RAM;
- At least 25GB of available storage for each VM;
- A processor with a minimum of four cores.
Installing VirtualBox on Windows, Linux, and Mac
Setting up VirtualBox on Windows, Linux, and macOS is a straightforward process, although configuring an operating system within VirtualBox may require some time. Don’t worry; we’ll guide you through every step of the way as we install and set up VirtualBox.
Installing VirtualBox on Windows:
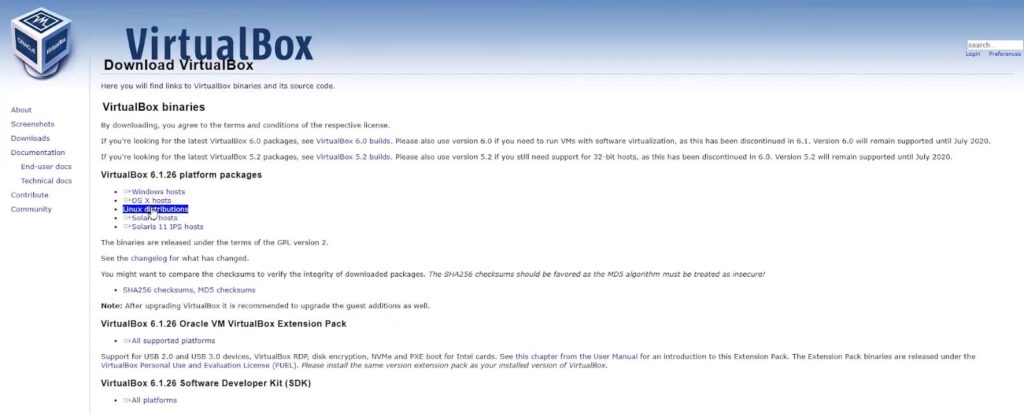
- Visit the official VirtualBox downloads page;
- Click on “Windows Hosts” to download the installer designed for Windows;
- Double-click on the downloaded installer file to initiate the installation process;
- Follow the on-screen instructions, adhering to the typical Windows installation procedure.
Installing VirtualBox on Mac:
- Visit the downloads page on the VirtualBox website;
- Select “OS X hosts” to download the DMG file tailored for macOS;
- Once the DMG file is downloaded, open it, and then drag its contents into your Applications folder.
Installing VirtualBox on Linux:
Installing VirtualBox on various Linux distributions (distros) is also a relatively straightforward process:
- Visit the Linux Downloads page on the VirtualBox website;
- Locate and download the installer package designed for your specific Linux distribution.
- For Ubuntu and Debian, look for DEB files;
- For Fedora, OpenSUSE, RedHat Enterprise Linux, and CentOS, you’ll need RPM files;
- After downloading the relevant package, double-click on it to commence the VirtualBox installation;
- If you encounter any difficulties during the Linux installation, you can refer to guides on how to install DEB and RPM files in Linux for further assistance.
Installing Linux within VirtualBox
The process of installing Linux within VirtualBox remains largely consistent across Windows, Linux, and macOS platforms. If you haven’t already, select a Linux distribution (distro) and download its ISO file so that it’s readily available when we reach the stage of loading it into the virtual machine (VM).
Let’s get started:
- Launch VirtualBox from your application menu;
- Click on “New.”;
- Provide a name for your Virtual Machine, specify the storage location, and select the downloaded ISO file of the Linux distro you intend to use. Ensure that you set the version to match your chosen distro. If your specific distro isn’t listed, choose the closest match or the one it’s based on. For instance, if you’re using a distro like Pop!_OS or Linux Mint based on Ubuntu, select Ubuntu as the version. VirtualBox will attempt to identify and select the closest operating system automatically;
- When you’re ready, click “Next.”;
- Set the password for the Virtual Machine’s user account. Keep in mind that this user will typically have sudo privileges by default. If the VM is intended for internet-facing services, make sure to choose a strong password. Afterward, click “Next.”;
- Allocate the amount of RAM using the slider or enter a specific value in the text box. For Ubuntu and Ubuntu-based distros, we recommend allocating a minimum of 4GB of RAM. You can also choose the number of virtual cores your VM will utilize. In our example, we allocated 8GB of RAM with 4 cores. If your computer has limited resources, 1 core with 4GB of RAM should suffice. Then, click “Next.”;
- On the following screen, you can adjust the slider to determine the size of the VM’s hard drive. The default suggestion is typically around 25GB, and you can adjust this value as needed;
- Review the summary, which provides an overview of your selections. Ensure that everything is correct, though most settings can be modified later if necessary;
- Your Virtual Machine will now boot, and you will be presented with the standard installation options for the operating system you selected;
- Follow these steps, and you’ll be well on your way to installing Linux within VirtualBox on your preferred platform.

Enhancing VirtualBox Functionality with the Extension Pack
Do you crave additional features and enhanced control over your virtual machines (VMs)? Installing the VirtualBox Extension Pack introduces a host of benefits, including USB support, webcam compatibility, and more. Here’s how to download and install this valuable extension for VirtualBox.
Follow these simple steps:
- Start by obtaining the VirtualBox Extension Pack. You can find it on the downloads page of the VirtualBox official website;
- Launch VirtualBox on your system and locate the menu icon located beside “Tools.” Click on it to access the menu, then select “Extensions.”;
- Within the Extensions Manager, click on the “Install” button situated near the top of the window;
- Choose the VirtualBox Extension Pack file from your download location and click “open.”;
- Finally, proceed to click on the “Install” button and accept the presented Terms and Conditions to initiate the installation process.
With the VirtualBox Extension Pack successfully integrated into your virtualization environment, you can now enjoy a wider array of features and functionalities for your VMs. Explore these tips and tricks to maximize your VirtualBox experience.