Maximize Your Chromebook: Learn How to Easily Install Linux
Welcome to our comprehensive guide for installing Linux onto a Chromebook! So if you’re ready to take your Chromebook to the next level and unlock its full potential with Linux, let’s dive in and get started!
How to Check Chromebook Compatibility for Linux Installation?
- Before diving into the installation process, it’s essential to confirm whether your Chromebook supports Linux installation. To do this, follow these steps;
- Turn on your Chromebook and log in;
- Click on the system tray located in the bottom-right corner of the screen;
- Select the “Settings” option;
- In the Settings menu, navigate to the “Linux (Beta)” section. If you don’t see this option, your Chromebook may not support Linux installation.
If the Linux (Beta) option is available, your Chromebook is compatible, and you can proceed with the installation.
How to Enable Developer Mode on Chromebook
Enabling Developer Mode is necessary to access advanced settings and install Linux. However, keep in mind that enabling Developer Mode will erase all local data on your Chromebook. Follow these steps carefully:
- Turn off your Chromebook completely;
- Press and hold the “Esc” and “Refresh” keys simultaneously;
- While holding these keys, press the power button to turn on the Chromebook;
- When the Chromebook boots up, you’ll see a scary warning screen. Press “Ctrl + D” to proceed;
- On the next screen, press Enter to enable Developer Mode.
Your Chromebook will restart and enter Developer Mode. This process may take several minutes.
How to Create a Chrome OS Recovery Disk
Creating a recovery disk is crucial in case something goes wrong during the installation process. Follow these steps to create a Chrome OS recovery disk:
- Visit the Chromebook Recovery Utility website: chrome://recovery;
- Click on the “Get started” button;
- Follow the on-screen instructions to download and install the Chromebook Recovery Utility;
- Once installed, open the Chromebook Recovery Utility;
- Insert a USB flash drive into your Chromebook;
- In the Chromebook Recovery Utility, select your Chromebook model from the list;
- Click on the “Continue” button;
- The utility will download the Chrome OS recovery image and create a recovery disk on your USB flash drive.
The utility will download the Chrome OS recovery image and create a recovery disk on your USB flash drive.
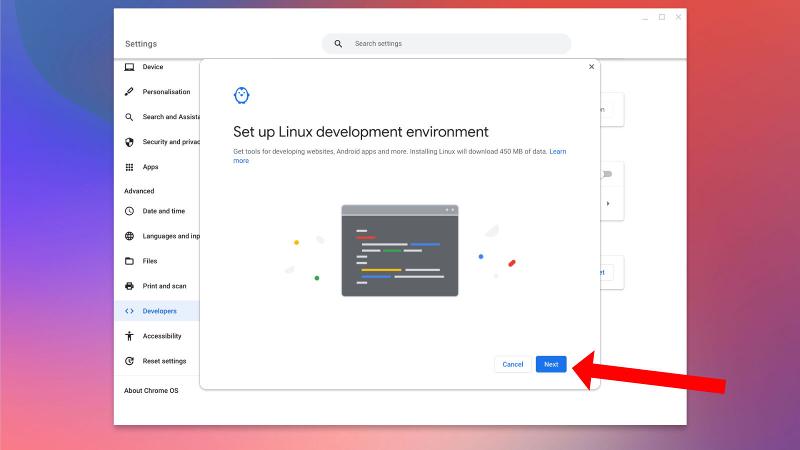
How to Install Linux on Chromebook Using Crostini
Crostini is a built-in feature that allows you to run Linux on Chrome OS. Follow these steps to enable and set it up:
- Go to your Chromebook’s Settings;
- Scroll down and select “Linux (Beta)” from the left sidebar;
- Click on the “Turn on” button to enable Linux (Beta);
- Follow the on-screen prompts to set up Linux (Beta). This process may take some time as the necessary files are downloaded and installed.
Once Linux (Beta) is set up, you’ll see a terminal window. Congratulations, you now have Linux running on your Chromebook!
How to Install Linux Applications on Chromebook
Now that Linux is installed, you can install your favorite applications and tools. Here’s how to do it using the command line:
- Open the Linux terminal by clicking on the Terminal icon in your app launcher;
- Use the following command to update the package list;
- sql;
- sudo apt update;
- After the update is complete, you can install applications using the apt package manager. For example, to install the Firefox web browser, use the following command:
- sudo apt install firefox;
- Follow the on-screen prompts to complete the installation.
How to Use Linux Commands on Chromebook
As a Linux user, it’s essential to familiarize yourself with basic commands. Here are some essential commands to get you started:
- ls: List directory contents;
- cd: Change directory;
- pwd: Print working directory;
- mkdir: Create a new directory;
- rm: Remove files or directories;
- cp: Copy files or directories;
- mv: Move files or directories;
- nano: A simple text editor for creating and editing files.
How to Switch Between Chrome OS and Linux on Chromebook
You can easily switch between Chrome OS and Linux on your Chromebook. To switch to Linux, follow these steps:
- Open the Terminal app. Enter the command:
sql
vmc start termina
- After a moment, enter the command:
vsh termina
You are now in the Linux environment. To switch back to Chrome OS, simply close the Linux terminal window.
Troubleshooting: Common Issues and Solutions
In the realm of Chromebook Linux integration, challenges may occasionally emerge despite meticulous preparation. But fret not! We’ve meticulously curated a compendium of common obstacles along with their adept solutions to empower you in troubleshooting effectively.
- Linux Installation Fails. Issue: Encounter errors or setbacks during the Linux installation process. Solution: Validate your Chromebook’s compatibility with Linux installation and ensure Developer Mode is engaged. Methodically revisit the installation steps, adhering to them rigorously. If impediments persist, consider performing a Chromebook powerwash and retrying the installation;
- Slow Performance. Issue: Witness sluggishness in Linux applications, particularly on older or less potent Chromebook models. Solution: Ponder augmenting your Chromebook’s hardware prowess by bolstering RAM or storage capacity. Additionally, mitigate performance lags by curtailing superfluous applications or processes consuming system resources in the background;
- Storage Space. Issue: Grapple with dwindling storage space, a predicament exacerbated by the installation of multiple Linux applications or storage of voluminous files. Solution: Vigilantly monitor your Chromebook’s storage consumption and purge redundant files or applications to reclaim space. Alternatively, expedite storage optimization by transferring files to external storage mediums or leveraging cloud-based storage solutions;
- Compatibility Issues. Issue: Encounter compatibility hiccups wherein certain Linux applications exhibit reluctance to function seamlessly within Chrome OS. Solution: Prior to deploying Linux applications, conduct thorough due diligence on their compatibility with Chrome OS. Explore alternative applications boasting comparable functionality or contemplate leveraging compatibility layers or virtualization solutions to circumvent incompatibility roadblocks;
- Network Connectivity Problems. Issue: Wrestle with connectivity woes, hindering seamless access to Wi-Fi networks or internet connectivity whilst leveraging Linux on your Chromebook. Solution: Scrutinize your network settings, ensuring Wi-Fi functionality is enabled and meticulously configured. A reboot of your Chromebook or router might alleviate transient connectivity conundrums. Further, verify that network drivers are up-to-date and harmoniously aligned with the Linux environment.
Should you require further elucidation, the boundless expanse of online forums, communities, and technical support reservoirs awaits your exploration.Conclusion
Congratulations! You’ve successfully installed Linux on your Chromium device. Enjoy exploring its many capabilities and discovering new ways to use your device.